Quick answer: Lowering a heat pump’s thermostat overnight does not guarantee a lower heating bill. The useful comparison is the full night plus the recovery period, including any backup heat. Check the instructions for your exact equipment and controller before changing its schedule. This worksheet helps you organize costs and questions; it does not prescribe a temperature setting.
If your thermostat shows AUX when the house warms up in the morning, do not count only the quiet overnight hours as savings. As colder weather arrives, record how the system operates before buying a new thermostat or assuming that the heat pump needs replacement.
Why the usual thermostat-saving advice needs a qualification
The Maryland Energy Administration warns that heating-mode setbacks can cancel out savings on heat pumps. That is not a rule that every programmable controller is unsuitable: the Department of Energy’s smart-technology guidance also notes that heat-pump-compatible controls can make setbacks cost-effective. Your system and its recovery logic matter.
Comfort Ready Home, funded by Bonneville Power Administration and Northwest utilities, explains that auxiliary heat can support a heat pump during cold weather, defrost, or temperature recovery. Backup may use electric resistance or another fuel. An AUX indication alone does not establish a fault. Do not disable backup heat or change installer-only settings to run this comparison.
A break-even example: how much recovery cost cancels the saving?
Assume a schedule reduces overnight electricity use by 2 kWh, priced at an illustrative $0.20/kWh. The avoided cost is $0.40. Now compare the additional recovery cost relative to the same system’s normal schedule—not all morning electricity. The following inputs are invented arithmetic examples, not measured performance or forecasts.
Additional recovery electricity
Added cost at $0.20/kWh
Net saving after $0.40 avoided overnight
1 kWh
$0.20
$0.20 saved
2 kWh
$0.40
$0.00: break-even
4 kWh
$0.80
$0.40 more expensive
Chosen scenarios only. Equal electricity rates in every period; fixed charges unchanged.
Net saving = avoided overnight cost − additional recovery cost. With time-of-use pricing, multiply each period’s kWh by its own rate. For example, 2 kWh avoided at $0.12 saves $0.24; an extra 2 kWh during recovery at $0.30 costs $0.60. That scenario costs $0.36 more even though the daily kWh change is zero. If backup burns gas, include its incremental fuel cost separately.
Copy this observation sheet before changing a schedule
Use existing utility interval data or equipment reports where available. A thermostat runtime report is not automatically a kWh measurement, and whole-home electricity includes appliances, water heating and EV charging. Do not open equipment or install a meter yourself for this exercise.
Record
Normal schedule
Manufacturer-supported alternative
Date, outdoor conditions and occupancy
_____
_____
Setpoints and schedule times
_____
_____
Overnight and recovery boundaries
_____
_____
kWh by period; source of measurement
_____
_____
Rates for those same periods
_____
_____
AUX observations; backup fuel if known
_____
_____
Comfort and unrelated large loads
_____
_____
Keep the completed record privately. This page does not collect your readings.
A colder comparison day can use more energy regardless of the schedule. Different occupancy, sunshine and other electric loads also weaken the comparison. Look for repeated comparable observations, and leave the result “inconclusive” when you cannot separate those effects. One cheaper night does not establish annual savings.
Questions for your installer or equipment support team
Ask: Is this controller configured for my heat pump and backup type? How does scheduled recovery work? Which schedule changes does the manufacturer support? Does the displayed runtime distinguish compressor and auxiliary operation? Which existing report, if any, measures electricity? Bring the model numbers and the observation sheet. Do not treat an unfamiliar thermostat label as a diagnosis.
Sources and method: Guidance linked above checked October 31, 2026. The DOE link is used only for its thermostat discussion, not for current tax-credit eligibility. All rates, kWh differences and dollar outcomes here are illustrative calculations. We have not tested your equipment or measured household savings. Follow its manual and qualified service advice; this record is not an HVAC diagnosis.
Quick answer: A crawl-space dehumidifier’s monthly electricity cost is not a fixed national number. Estimate it from the exact unit’s measured or rated power, its actual compressor runtime, and your all-in variable electricity rate: (watts ÷ 1,000) × runtime hours per day × billing days × $/kWh. In a clearly labeled example, a 500-watt unit averaging 6, 12, or 24 compressor-hours per day uses about 90, 180, or 360 kWh in a 30-day month. At an assumed $0.18/kWh, that is $16.20, $32.40, or $64.80. Replace every assumption with your label, plug-in meter, utility bill, and runtime log.
Start with the number your electric meter sees
Contractor quotes often make the dehumidifier look like a one-time equipment decision. The operating cost can matter for years, but it depends heavily on moisture load, enclosure quality, climate, temperature, setpoint, drainage, filter condition, and whether the compressor cycles off. A nameplate watt figure multiplied by 24 hours is a useful worst-case screen, not a promise of normal use.
Input
Where to find it
What to record
Power while dehumidifying
Manufacturer data, EnergyGuide information when available, or a compatible plug-in energy meter
Watts or kWh during a measured period
Compressor runtime
Built-in app, smart plug, dedicated meter, or a one-week observation log
Average hours per day; distinguish fan-only time if possible
Variable electricity price
Utility bill or tariff
Supply plus delivery charges that change with kWh; do not automatically add fixed customer charges
Billing period
Utility bill
Actual days, not an assumed calendar month
ENERGY STAR measures dehumidifier efficiency as Integrated Energy Factor (IEF), in liters of water removed per kilowatt-hour. A higher IEF means more moisture removal per unit of electricity under the test procedure. Capacity, measured in pints removed per 24 hours under specified conditions, is a different metric. Do not compare two machines by wattage alone when their capacities differ.
Monthly electricity-cost worksheet
Convert power to kilowatts: watts ÷ 1,000.
Estimate monthly runtime: hours per day × billing days.
If you measured total kWh directly, skip the watts and runtime estimate and multiply measured kWh by the applicable rate.
Illustrative scenario
Calculation
30-day energy
Cost at assumed $0.18/kWh
500 W, 6 hours/day
0.5 × 6 × 30
90 kWh
$16.20
500 W, 12 hours/day
0.5 × 12 × 30
180 kWh
$32.40
500 W, 24 hours/day
0.5 × 24 × 30
360 kWh
$64.80
These are arithmetic examples, not national averages or expected performance. Actual draw and runtime vary by model and site.
If your utility uses time-of-use prices, split the measured kWh by price window. If the machine is hardwired or uses a voltage or receptacle that your meter cannot safely handle, do not improvise a measurement setup. Ask an electrician or use the equipment’s supported monitoring method.
Why a 24-hour calculation can overstate—or understate—the bill
A humidistat normally cycles the compressor after the space reaches its setting. The fan may continue to run on some models, so “I hear it running” is not the same as full compressor power. Conversely, a dehumidifier may approach continuous operation during wet weather, after encapsulation work, or when outside air, soil moisture, leaks, or drainage problems keep adding water.
Observation
What it may mean
Useful next check
Runtime drops after several dry days
Initial drying load may be declining
Keep the same setpoint and log kWh for a full billing cycle
Runtime spikes after rain
Bulk water, groundwater, drainage, or air leakage may be adding moisture
Inspect for standing water, leaks, downspout discharge, grading, sump operation, and liner defects
Runs continuously but humidity stays high
Unit may be undersized, obstructed, frosted, poorly drained, or fighting an open/wet space
Compare an independent hygrometer, filter, coil, drain, temperature, and enclosure condition with the manual
Short cycles in a cool crawl space
Frost protection or low-temperature operation may be involved
Check the model’s operating-temperature specification
ENERGY STAR notes that frost can form on coils below 65°F unless the product is designed for lower temperatures. It also advises keeping doors and windows to the treated space closed and maintaining clear airflow. A crawl space is not a normal room, so follow the model’s installation instructions and the design of the crawl-space system.
Compare quotes on lifetime scope, not just equipment price
Ask every contractor to separate the unit from the work needed to make it operate effectively. A low equipment price is not directly comparable with a quote that includes electrical work, a drain route, a condensate pump, hanging hardware, duct collars, remote monitoring, startup verification, and service access.
Quote line
Confirm in writing
Exact model
Capacity, IEF, operating wattage or published annual kWh, low-temperature rating, warranty
Electrical
Existing outlet or new circuit, permit/inspection if required, disconnect or protection specified by code and manufacturer
Condensate
Gravity drain or pump, route, termination, freeze protection where relevant, overflow shutoff
Air path
Clearances, supply/return ducting if used, service access, filter access
Moisture source work
What sealing, liner, drainage, sump, leak repair, debris removal, or mold work is included—and what is excluded
If the crawl space still has standing water or an uncontrolled leak, treat that as a separate diagnosis. The EPA’s mold guidance emphasizes moisture control and notes that high-RH crawl spaces—especially those with bare-earth floors—are common hidden-mold locations. A dehumidifier can manage residual humidity; it is not a substitute for stopping water entry.
A practical 14-day verification plan
Record the date, outdoor weather, crawl-space temperature, and humidity from an independent meter.
Record the setpoint and whether the unit is in auto, continuous-fan, or another mode.
Measure supported kWh for seven days without changing the setpoint.
Inspect the filter, airflow clearances, drain, liner seams, vents, standing water, and obvious leaks.
Repeat for seven more days after only justified maintenance or moisture-source corrections.
Annualize cautiously: humid-season runtime should not automatically be multiplied by 12 months.
Do not lower the setpoint simply to make the machine run more, and do not raise it simply to cut the bill without considering moisture risk. The right setting depends on the building assembly, climate, temperature, and professional design. ENERGY STAR says building RH is generally considered optimal between 30% and 50%, while EPA guidance emphasizes keeping indoor humidity below 60%; those broad references are not a crawl-space design specification for every home.
Electrical and drainage limits
Use the grounded outlet and electrical setup required by the manufacturer and local code. ENERGY STAR advises keeping drainage away from electrical circuits and cords. The CPSC warns that permanent extension-cord use is less safe than installed wiring and that electricity and water create shock and fire hazards. Do not work on energized equipment in a damp crawl space. Hire a qualified electrician for a new receptacle, circuit, or uncertain wiring condition.
Frequently asked questions
Should I use the wattage on the label or an energy meter?
Use measured kWh when you can do so safely with compatible equipment. Label wattage is useful for a screening estimate, but it may not reflect cycling, fan-only operation, standby power, or changing site conditions.
Is annual kWh from a product listing better than watts?
It can be a useful standardized comparison between models. It is not a guarantee of your home’s annual use because the test assumptions may not match your crawl space, climate, setpoint, or moisture load.
Does encapsulation eliminate the need for a dehumidifier?
Not necessarily. Some enclosed crawl spaces need active drying; others can meet the design target through a different approved approach. Compare the full scope in our crawl-space vapor barrier vs. encapsulation cost guide and have the actual moisture source and building design evaluated.
What if the electric bill jumps after installation?
Compare bill days, weather, rate changes, and whole-home kWh first. Then measure the dehumidifier’s supported kWh and inspect runtime, filter, drain, temperature, enclosure, and water entry. A higher bill alone does not identify the cause.
This guide provides planning arithmetic and quote questions, not a site inspection, engineering design, electrical approval, mold assessment, or product endorsement.
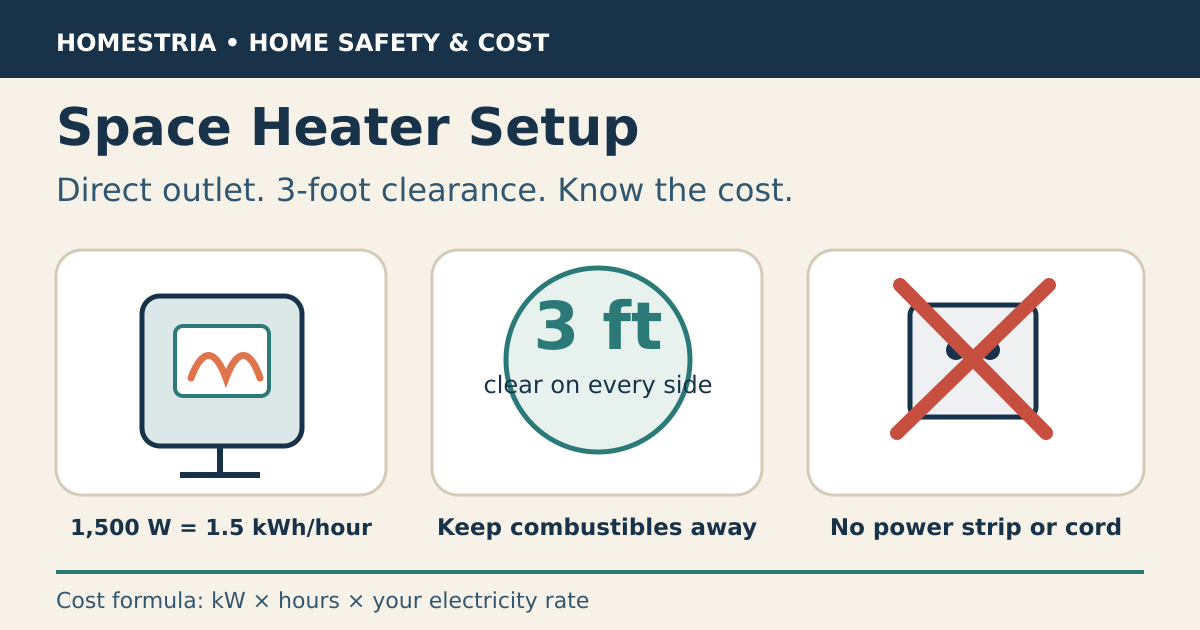
Quick answer: No—do not plug an electric space heater into a power strip, surge protector, or extension cord. The U.S. Consumer Product Safety Commission says to plug it directly into a wall outlet, keep it at least 3 feet from anything that can burn, and turn it off before sleeping. A 1,500-watt heater uses 1.5 kilowatt-hours for every hour it runs. At an illustrative electricity rate of $0.18 per kWh, that is $0.27 per hour, $32.40 for 4 hours a day over 30 days, or $64.80 for 8 hours a day.
A space heater can warm one occupied room without waiting for the whole house to change temperature. It is also one of the largest plug-in loads most homes use. The safe setup and the operating-cost math matter more than marketing terms such as “ceramic,” “infrared,” or “energy-saving.”
Safe setup in one minute
Plug the heater directly into a wall outlet. Do not use a power strip, surge protector, or extension cord.
Keep at least 3 feet of clear space on every side from bedding, curtains, furniture, paper, clothing, and other combustible materials.
Place it on a stable, level floor where it cannot be knocked over.
Keep the cord visible and uncovered. Never route it under a rug or carpet.
Do not plug another high-load appliance into the same circuit while the heater is running.
Turn it off when you leave the room and before sleeping.
Test smoke alarms monthly and follow the heater manufacturer’s instructions.
CPSC’s January 23, 2026 winter safety release estimates that portable heaters were involved in an average of 1,600 fires, 70 deaths, and 150 injuries per year during 2020–2022. Those figures cover portable heaters generally; they are not a count of power-strip incidents alone.
Why a power strip is the wrong connection
A typical full-power portable heater is rated at 1,500 watts. On a nominal 120-volt circuit, that is about 12.5 amps. The heater can run near that load for long periods, which makes loose contacts, undersized cords, and extra plug connections more important than they are for a phone charger or lamp.
A surge protector does not make this safe. Surge protection addresses voltage spikes; it does not turn a multi-outlet strip into a dedicated heater receptacle. A “heavy-duty” extension cord also does not override the current CPSC instruction to plug an electric space heater directly into a wall outlet.
Stop using the heater if the plug or outlet gets hot
Warm air from the heater is normal. A hot plug, hot receptacle, scorch mark, buzzing outlet, loose-fitting plug, burning odor, or repeated breaker trip is not. CPSC advises disconnecting a heater if its cord or plug becomes hot and contacting an authorized repair person. If the outlet itself is hot, contact a certified electrician.
Do not solve repeated trips by installing a larger breaker, using another adapter, or moving the heater to an unverified extension cord. The trip may be warning you about an overloaded circuit, a damaged heater, or a poor connection. Record which outlet and other appliances were in use, then have the cause checked.
Space-heater running cost formula
Use the heater’s nameplate wattage and your utility’s all-in per-kWh rate:
Cost = (watts ÷ 1,000) × hours used × electricity rate per kWh
Example
Energy use
Cost at $0.18/kWh
750 W for 1 hour
0.75 kWh
$0.14
1,500 W for 1 hour
1.50 kWh
$0.27
1,500 W, 4 hours/day, 30 days
180 kWh
$32.40
1,500 W, 8 hours/day, 30 days
360 kWh
$64.80
Illustrative examples only. Replace $0.18 with the rate on your bill. A thermostat cycling the heater off reduces actual runtime; a heater running continuously does not.
The $0.18 rate is an assumption for the examples, not a claim about your state or utility. If your bill separates supply, delivery, and adjustments, use the total variable cents per kWh that changes when consumption changes. Homestria’s electric-bill guide explains what to look for.
Does a space heater save money?
Not automatically. A space heater can reduce cost when you heat one occupied room and lower the central-heating setpoint enough to avoid heating unused space. It can raise cost when it runs in addition to unchanged central heat, when several rooms each use one, or when it runs unattended.
The heater plug does not fit snugly in the outlet.
The outlet, wall plate, plug, or cord becomes hot.
You see discoloration, melting, or scorch marks.
You hear buzzing or smell hot plastic.
The breaker trips repeatedly with the heater as the main load.
The room has only ungrounded two-slot outlets or damaged receptacles.
Stop using the heater at that location until the cause is checked. This article provides planning and safety information; it is not an electrical inspection.
Frequently asked questions
Can I use a surge protector with a space heater?
No. CPSC says to plug an electric space heater directly into a wall outlet, never a power strip. A surge protector does not change that guidance.
Can I use a heavy-duty extension cord?
Current CPSC winter guidance says never use an extension cord or power strip with an electric space heater. Move the heater to a safe location where its own cord reaches a suitable wall outlet.
How much does a 1,500-watt space heater cost per hour?
Multiply 1.5 kWh by your electricity rate. At $0.18 per kWh, the example is $0.27 per hour. At $0.30 per kWh, it is $0.45 per hour.
Can I leave a space heater on overnight?
No. CPSC and the U.S. Fire Administration advise turning space heaters off before sleeping.
What does the 3-foot rule include?
Keep the heater at least 3 feet from drapes, furniture, bedding, clothing, paper, and anything else that can burn. Measure from every side, not only the front grille.
Quick Answer: Replacing an electrical panel and upgrading the home’s electrical service are not the same job. A panel replacement usually changes the breaker box itself, while a full service upgrade can also involve the meter base, service conductors, mast or underground service, grounding, utility coordination, permits, and inspection. In current 2026 planning data, Angi reports electrical-panel replacement at about $518–$2,193, averaging about $1,347. ENERGY STAR says a standard higher-capacity panel upgrade can run roughly $1,000–$2,500, while a service-side upgrade can range from roughly $2,000 to $30,000 when utility or service-line work is required.
Panel Replacement vs. Service Upgrade at a Glance
Scope
2026 planning figure
What may be included
What to verify
Panel replacement
$518–$2,193; average about $1,347
New load center, breakers, standard labor
Same amperage or higher? Permit, drywall, wiring corrections, grounding
Higher-capacity panel work
ENERGY STAR sample: $1,000–$2,500
Larger panel for added electric loads
Whether the existing service can actually support the new rating
Full service upgrade
ENERGY STAR warns roughly $2,000–$30,000 in some cases
Panel plus service-side equipment and utility work
Meter base, mast, service entrance, trenching, utility charges, timing
The wide service-upgrade range is not a typo. A simple indoor panel swap and a project that changes the utility connection are fundamentally different scopes. That is why two bids labeled “200-amp upgrade” can be thousands of dollars apart without either quote necessarily being wrong.
A 200-Amp Panel Does Not Automatically Mean 200-Amp Service
One of the most useful distinctions in this project is physical panel space versus electrical capacity. Empty breaker spaces can make it easier to add circuits, but they do not prove the service has enough capacity for an EV charger, heat pump, electric water heater, induction range, or other new load.
ENERGY STAR recommends checking the main breaker rating and having a licensed electrician evaluate the home’s electrical capacity and planned loads. DOE building-science guidance also notes that load calculations—not simply adding breaker ratings—are used to determine whether the existing service can support additional equipment.
When a Panel-Only Replacement May Be Enough
The existing service capacity is adequate after a proper load review.
The panel is damaged, obsolete, corroded, difficult to service, or short on safe breaker space.
The project does not require a larger utility service.
The meter base, service entrance and grounding do not need a broader upgrade.
A panel-only job can still uncover extra work. Older wiring, damaged conductors, grounding or bonding corrections, panel relocation, drywall repair, and permit requirements can all change the final total.
When a Full Service Upgrade May Be the Real Project
The home’s calculated electrical load exceeds the capacity of the existing service.
A major electrification project adds several large loads at once.
The service entrance, meter equipment or utility connection cannot support the proposed amperage.
Local utility or inspection requirements trigger meter, mast, grounding, trenching or service-conductor work.
The electrician, local authority having jurisdiction and utility each can affect the final scope. A contractor can replace the panel inside the home, but utility-owned or service-side work may require a separate process, appointment or charge.
A Simple Quote-Normalization Example
Suppose Quote A is $1,900 for a same-capacity panel replacement. Quote B is $5,200 for a 200-amp service upgrade that includes a new panel, meter base, service conductors, utility coordination, grounding work and permit handling.
The difference is $3,300, but the quotes are not competing for the same job. Before choosing the lower number, ask whether the home actually needs more service capacity and whether Quote A leaves the existing service equipment unchanged. Before choosing the higher number, ask for the load calculation or other evidence that the broader scope is needed.
What Should Be Written Into the Quote?
Existing service rating and proposed service rating.
Panel manufacturer, main-breaker rating and number of spaces.
Whether the job is panel-only or a full service upgrade.
Meter base, service mast, weatherhead or underground service work.
Service conductors and grounding/bonding work.
Utility disconnect/reconnect and coordination responsibility.
Permit, inspection and utility fees.
Drywall, siding, trenching or finish restoration.
Load calculation or capacity basis for the recommendation.
Change-order rules if hidden wiring problems are found.
Do Not Budget a 2026 Federal Panel Tax Credit
ENERGY STAR’s federal panel-upgrade tax-credit page states that the credit applied to qualifying products installed through December 31, 2025. For a new 2026 project, start with a $0 federal panel-credit assumption unless a tax professional identifies a separate rule that applies to your circumstances. State, utility or local programs may still exist and should be checked separately.
Safety Limits
Main-panel and service work is not a homeowner trial-and-error project. The U.S. Consumer Product Safety Commission lists buzzing or sizzling, overheating, odors and power outages among warning signs associated with home wiring hazards. If a panel is hot, visibly damaged, arcing, smoking or producing a burning odor, stop treating the issue as a budgeting exercise and arrange prompt professional evaluation.
Frequently Asked Questions
Does a new electrical panel increase my home’s amperage?
Not automatically. A new panel can be installed while the home keeps the same service capacity. Increasing service amperage can require changes beyond the panel, including service conductors, meter equipment and utility coordination.
Does a full breaker panel mean I need a service upgrade?
No. Physical breaker space and electrical capacity are different constraints. A licensed electrician can evaluate whether a subpanel, panel reconfiguration, load management or a true service upgrade is appropriate.
How much does electrical-panel replacement cost in 2026?
Angi reports a current national range of about $518–$2,193, with an average around $1,347. Your final quote can move outside that range based on amperage, wiring corrections, relocation, permits and finish work.
Why can a service upgrade cost so much more?
Because the project can extend beyond the breaker box to the meter, service entrance, utility connection, trenching or overhead equipment. ENERGY STAR notes that service upgrades can reach far beyond a standard panel-only project.
Quick answer: Compare a heat pump with a furnace using the same home, comfort needs, and cooling plan. A heat pump can provide heating and cooling; a furnace quote may cover heating alone. The lower heating bill depends on your electricity price, gas price, and the heat pump’s performance in your climate—not simply on which machine has the higher efficiency number.
A $7,000 furnace quote and a $14,000 heat-pump quote are not enough to make the decision. Does the first leave an aging air conditioner in place? Does the second include electrical work and backup heat? Before comparing the totals, ask both contractors to price the same finished job.
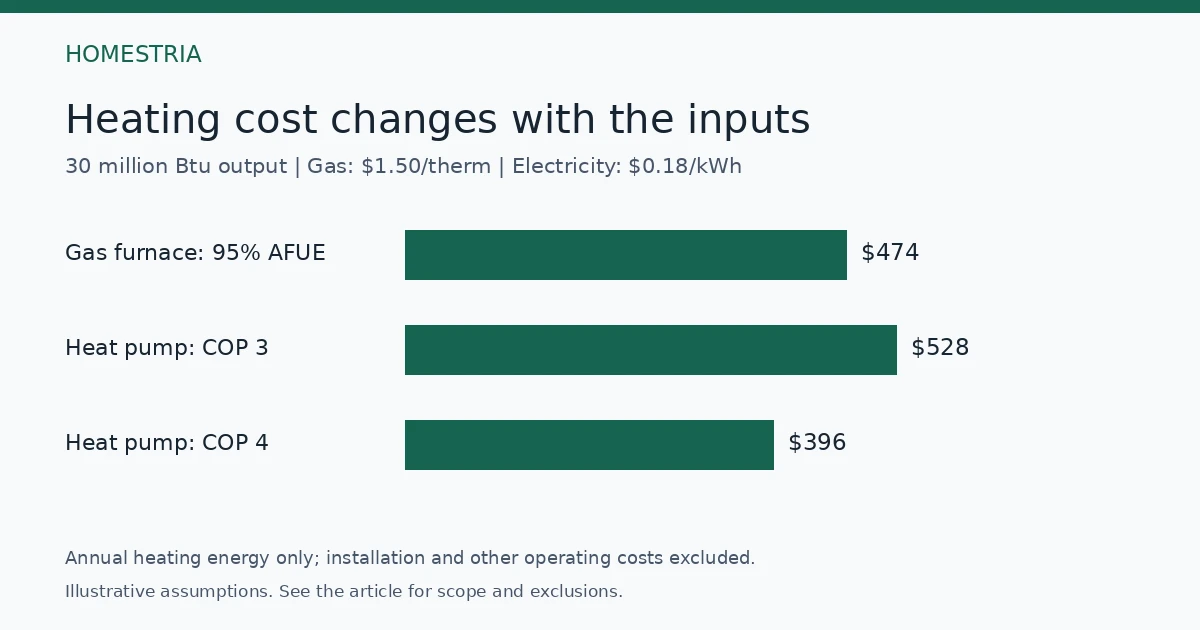
Illustrative energy costs only. See the assumptions and exclusions in the comparison below.
Start with a comparable installation quote
Request these items in writing; prices below are not national cost estimates.
Scope
Heat pump proposal
Furnace proposal
Heating and cooling
Indoor and outdoor equipment, controls, backup plan
Furnace plus any air-conditioning work needed during your comparison period
Use the contractor quote comparison guide to separate firm prices from allowances. If one bid leaves electrical work “as needed,” get an allowance or a separate electrician’s estimate before treating it as the cheaper option.
The two efficiency numbers mean different things
A furnace’s annual fuel utilization efficiency (AFUE) describes useful heat output relative to fuel input over the heating season. A 95% AFUE assumption means 0.95 units of useful furnace heat per unit of fuel energy; it does not include every loss between the equipment and each room. See the Department of Energy’s furnace methodology.
For the heat pump, coefficient of performance (COP) compares heat delivered with electricity consumed in the same energy units. Our worksheet uses an assumed seasonal effective COP, including backup heat in the modeled electricity use. It is not a guarantee or a label rating. Ask the contractor for a climate-specific energy estimate, low-temperature capacity, and the expected backup-heating share.
HSPF2 is a standardized seasonal heating rating; SEER2 describes cooling efficiency. Neither number should be entered directly as COP. DOE explains the ratings and why climate matters in its air-source heat-pump purchasing guide. A cold-weather design also needs enough output on the coldest design days, not merely an attractive annual average.
Compare the heating energy cost with your own rates
Use the marginal electricity and gas rates you would actually pay for the added usage, including variable delivery charges and applicable taxes. Keep fixed monthly service charges separate. Your whole-home bill includes other uses, so dividing it by floor area is not a heating estimate. Start with how to read your electric bill.
Worksheet formulas: Furnace fuel cost = annual heat output needed in Btu ÷ (100,000 × AFUE as a decimal) × dollars per therm. Heat-pump electricity cost = annual heat output needed in Btu ÷ (3,412 × effective COP) × dollars per kWh.
The energy conversions are 100,000 Btu per therm and approximately 3,412 Btu per kWh; see EIA’s energy-unit reference. Use the same output boundary for both options. Distribution losses, furnace blower electricity, and any heat-pump auxiliaries omitted from your COP estimate need separate adjustments.
Illustrative annual heating-energy costs: 30 million Btu of useful equipment output, 95% AFUE furnace, heat pump effective COP 3.0. These are chosen scenarios, not utility averages.
Electricity / gas rate
Furnace
Heat pump
$0.12/kWh; $2.50/therm
$789
$352
$0.18/kWh; $1.50/therm
$474
$528
$0.30/kWh; $1.50/therm
$474
$879
The middle row is a useful warning against assuming that a heat pump must cut the bill. At $0.18/kWh and $1.50/therm, the heating-energy break-even effective COP is about 3.34. At COP 2.0 the modeled heat-pump cost rises to about $791; at COP 4.0 it falls to about $396. Ask which seasonal performance estimate is credible for your actual equipment and location.
What happens to the higher installation price?
Suppose matched, complete quotes are $11,000 for a furnace-and-air-conditioner option and $14,500 for a heat-pump option. These are hypothetical quotes, not reported market prices. The heat-pump premium is $3,500. Using the first rate scenario above gives roughly $438 in annual heating-energy savings, so simple payback is about eight years. Using the middle scenario gives no heating-energy payback because that heat pump costs more to run.
That calculation is only a first pass. Add any difference in cooling energy, maintenance, repairs, financing and fixed utility charges. If you keep gas for cooking or hot water, do not count the entire gas customer charge as savings. Compare both choices over the same period and account for equipment that would need replacing partway through it. A simple payback is not a promised equipment life or investment return.
Three situations that change the decision
Your furnace works and the AC is young. Compare repairing or retaining the present system with replacing it now. The entire new installation cost matters; an efficiency premium against equipment you did not need to buy is not the right baseline.
Both heating and cooling are due for replacement. This is the cleaner comparison: price a complete furnace-plus-AC option against the complete heat-pump system, then evaluate local operating costs and comfort.
Your home needs substantial cold-weather backup. Ask how much heat the compressor supplies at the local design temperature, when backup starts, and whether it is electric resistance or a retained furnace. A dual-fuel proposal needs separate electric and gas operating hours; do not give all delivered heat the compressor’s best COP.
Already own a heat pump and want to understand a winter bill? Use the overnight setback and morning recovery cost worksheet before assuming that a lower night setting saves money. It separates a scheduling question from an equipment-replacement decision.
Treat incentives as confirmed funding, not a discount label
For equipment placed in service in 2026, do not subtract the former federal Section 25C heat-pump credit. The IRS states that 25C is unavailable for property placed in service after December 31, 2025. State and utility programs are separate: verify current funding, income rules, equipment eligibility and any required preapproval with the program administrator.
Show the full amount due to the installer and the timing of any verified reimbursement separately. A rebate paid later does not reduce the cash needed on installation day. Our home energy upgrade budget guide explains how to keep that distinction visible.
What to bring to the final quote review
Bring 12 months of utility usage, the age and condition of both existing systems, and your expected ownership period. Request an itemized scope, load calculation, low-temperature capacity and backup assumptions, permits, commissioning checks, exclusions and labor warranty. Have the contractor show the annual cost at today’s rates and at a less favorable rate or efficiency assumption.
If the savings disappear under a modest change, comfort or equipment condition may still justify the project—but it should not be sold to you as a certain bill reduction. If the present furnace only needs assessment, start with the furnace inspection guide.
If that assessment leaves you choosing between a major repair and replacement, use the furnace repair-versus-replacement worksheet to normalize the diagnosis, safety findings, work scope, and out-of-pocket totals.
Sources and calculation notes
Sources checked September 21, 2026, U.S. Eastern time: DOE furnace and heat-pump purchasing guidance, EIA energy units, and IRS credit termination guidance linked above. All dollar quotes, energy prices and operating scenarios are Homestria illustrations. Figures are rounded after calculation. This guide does not size equipment, evaluate a particular home, or replace an on-site assessment.
Air sealing and insulation are not substitutes. Air sealing closes pathways that let conditioned air escape through the attic floor; insulation slows heat flow through the ceiling assembly. ENERGY STAR recommends completing attic air sealing before adding insulation. For planning, a professional air-sealing scope is commonly $250–$750, while professional attic insulation is commonly $1,700–$2,500, with a cited national average around $2,100. Removal, moisture repairs, wiring corrections, ventilation work, and hazardous-material handling can make the final price materially higher.
The practical order is usually: diagnose moisture and safety issues, seal the attic floor, preserve required clearances and ventilation, then install insulation to a climate-appropriate R-value.
Air sealing vs. insulation at a glance
Scope
What it does
Typical planning range
What can be missing
Air sealing
Closes leakage paths at penetrations, soffits, chases, hatches, and wall tops
$250–$750
Combustion testing, ventilation changes, insulation replacement, hazardous-material work
Attic insulation
Adds thermal resistance above the ceiling
$1,700–$2,500; average about $2,100
Air sealing, removal, vent baffles, electrical corrections, roof or moisture repairs
Insulation removal
Removes damaged, contaminated, or obstructive material
$1–$1.50 per sq. ft.
Disposal surcharges, remediation, repair of the underlying cause
Separate inspection
Documents conditions and helps define scope
$100–$300
Diagnostic testing may be extra or included in another service
These are national planning ranges, not bids. Location, attic size, access, climate target, material, existing depth, contamination, and contractor scope all matter.
What air sealing fixes
Insulation can slow heat transfer, but it does not reliably stop air moving through gaps. Common leakage locations include the attic hatch, wiring and plumbing penetrations, open wall cavities, dropped soffits, recessed fixtures, duct or flue chases, and kneewall framing.
Dirty or darkened insulation can be a clue: air moving through fibrous insulation may filter household dust. Frost or staining can indicate warm, moist indoor air reaching cold surfaces. Those clues do not identify the entire repair by themselves, but they are useful questions for an inspection.
A complete air-sealing quote should state which penetrations and bypasses are included, how existing insulation will be moved and restored, what materials will be used near heat sources, and whether testing is included.
What insulation fixes
Insulation adds resistance to heat flow. Its performance is expressed as R-value, but the right target depends on climate, assembly, and how much usable insulation already exists. A contractor should document the existing condition and the finished target rather than quoting only a number of bags or inches.
Insulation also needs to be installed without blocking soffit vents or covering fixtures that require clearance. Around recessed lights, the IC rating matters. Around flues and chimneys, heat-safe clearances and materials matter. More insulation is not automatically better if it is installed over unresolved leaks, moisture, unsafe wiring, or blocked ventilation.
Why sealing usually comes first
Once fresh insulation covers the attic floor, the leakage paths underneath become harder to reach. Sealing first allows the contractor to expose and close bypasses, then restore or add insulation evenly.
This sequence also makes the project easier to verify. Before insulation is added, the homeowner can ask for photos of sealed top plates, plumbing and wiring penetrations, dropped soffits, the attic hatch, and safe dams around heat-producing components. After insulation is installed, ask for photos showing depth markers, baffles, hatch treatment, and the finished coverage.
Attic insulation: cited national average of $2,100.
Existing insulation can remain; no removal: $500 + $2,100 = $2,600.
If 1,000 square feet must be removed at the $1–$1.50 midpoint: 1,000 × $1.25 = $1,250.
With removal: $500 + $2,100 + $1,250 = $3,850.
If a separate inspection is also priced at the $100–$300 midpoint: add $200, for $4,050.
This example excludes taxes, roof repair, mold or pest remediation, electrical work, vent rerouting, mechanical ventilation, asbestos testing or abatement, and utility-program requirements. An inspection may already be bundled into another scope, so do not automatically add it twice.
How location and house conditions change the quote
Climate affects the target R-value and the value of reducing heat loss or heat gain. Labor rates and disposal fees vary by market. A low-slope or obstructed attic can require more labor than an open attic of the same floor area. Kneewalls, multiple chases, recessed lights, and complicated additions can add sealing detail.
Existing material matters too. Clean, dry insulation may be moved and restored. Wet, moldy, pest-contaminated, or vermiculite-like material changes the job. If vermiculite is present, do not disturb it casually; have the condition evaluated before proceeding.
Safety conditions that should change the plan
Pause the project and seek qualified help when you find wet insulation, roof leakage, mold or rot, bath or dryer exhaust terminating in the attic, insufficient ventilation, knob-and-tube wiring, vermiculite, or difficult access.
Air sealing can also change how the house supplies combustion air. If the home has naturally vented gas- or oil-fired equipment, ask whether pre- and post-work combustion-safety testing is appropriate. Tighter construction can also affect indoor pollutants, so radon and ventilation may need attention.
How to compare contractor quotes
Ask every bidder to answer the same questions:
What is the measured attic area, existing insulation depth, and estimated existing R-value?
What finished R-value and material are included?
Is attic-floor air sealing included, and which bypasses will be addressed?
Will existing insulation be moved and restored?
Are vent baffles, depth rulers, and attic-hatch treatment included?
How will flues, chimneys, non-IC fixtures, and wiring be handled?
Is insulation removal necessary, and what condition requires it?
Are disposal, cleanup, permits, and taxes included?
Is diagnostic testing or an energy assessment included?
Are utility rebates available, and must approval occur before work begins?
What photos or measurements will document completion?
What workmanship and material warranties apply?
Savings claims: use your house, not a slogan
ENERGY STAR says air sealing combined with insulation can reduce annual energy bills in many homes, but a national percentage is not a guarantee for an individual property. A useful estimate should use the home’s recent utility bills, local weather, fuel and electricity rates, existing leakage, insulation levels, and the actual scope.
If a contractor promises a fixed payback without showing assumptions, ask for the calculation in writing. Comfort, ice-dam risk, moisture control, and equipment runtime can matter even when the simple energy-payback period is long.
When each scope may be enough
Air sealing alone may be reasonable when insulation levels are already adequate and evenly installed, but testing or inspection identifies meaningful bypasses. Insulation alone is harder to justify when obvious leakage paths remain accessible underneath it. Both may be appropriate when the attic is leaky and under-insulated.
Removal is not automatically required. Clean, dry material can often remain while targeted areas are moved for sealing. Removal becomes more likely with moisture damage, contamination, pests, unsafe materials, or when access to the air barrier is otherwise impossible.
Bottom line
Treat the attic as one system, but price the work in separate scopes. Diagnose moisture and safety conditions first. Seal the attic floor before burying the leakage paths. Then install insulation to a documented target without blocking ventilation or violating clearances. The best quote is not the one with the lowest total; it is the one that makes the finished assembly and exclusions easy to verify.
Frequently Asked Questions
Is air sealing included in an attic-insulation quote?
Not necessarily. Some contractors include limited sealing while others price it separately. Ask for the exact penetrations and bypasses included, plus before-and-after documentation.
Can I add insulation without removing the old material?
Often, yes, if the existing insulation is dry, clean, compatible with the assembly, and not hiding a condition that needs correction. Removal may be warranted for moisture, pests, contamination, hazardous material, or access.
How much does attic air sealing cost?
A current national planning range is about $250–$750, but complex access, testing, heat-safe detailing, and ventilation changes can raise the scope.
How much does attic insulation cost?
A current professional planning range is about $1,700–$2,500, with a national average around $2,100. The attic area, material, climate target, access, and preparation determine the actual bid.
Does more insulation stop drafts?
Insulation can slow heat flow, but drafts often require air sealing. Fibrous insulation is not a reliable substitute for closing leakage paths.
Should I get an energy audit first?
It can help when the cause of discomfort or high bills is unclear, when several upgrades compete for the budget, or when a utility program requires testing. Confirm what testing and reporting the audit includes.
This article uses current public sources and transparent calculations. It is not a site inspection, energy model, building-code determination, hazardous-material assessment, or contractor estimate. No direct testing or professional review is claimed.
A room is uncomfortable and its windows are old. Before committing to replacement, you want to know whether the problem is the window itself, air leakage, shading, or insulation elsewhere.
Imagine an $8,000 replacement quote with hypothetical energy savings of $200 a year. Simple energy-only payback would be 40 years; at $400 a year it would be 20 years. These are invented inputs, not typical costs or promised savings. Comfort, damage, financing and service life need their own assessment.
What would you do first? Choose a next step below, then use the full guide to compare the work and assumptions in actual proposals.
Prices checked September 10, 2026. This guide covers existing residential doors and windows in the United States.
Quick Answer
A professional weatherstripping project costs $132–$438 in HomeAdvisor’s current national benchmark, with an average of $285. Use that as an initial planning range, then compare a quote for your exact openings with a DIY materials list. Simple, accessible seals are better DIY candidates than damaged frames or doors that need adjustment. See the HomeAdvisor cost benchmark.
Do not assume weatherstripping alone will cut your energy bill by 10%. ENERGY STAR’s saving figure covers air sealing and added insulation together. Your result depends on the leaks you actually fix. Read ENERGY STAR’s scope.
Price the same openings before comparing DIY and labor
A quote for two exterior doors cannot be compared fairly with a shopping list for eight windows. Write down the number of openings, the length and profile of each seal, removal of old material, and any sweep or threshold work.
HomeAdvisor gives a broad materials range of $0.10–$4 per linear foot and an eight-window, 120-foot example of $30–$90. Those figures cover different material assumptions; specialty products can cost more. Its labor estimate is about 80% of an installed bill, not a guaranteed saving for every DIY job.
Compare this
Record for both options
Openings
Same doors/windows and measured lengths
Product
Material, profile, package size, and fit
Preparation
Old-strip removal and surface preparation
Additional work
Sweeps, thresholds, alignment, and frame repairs
Final cost
Materials, needed tools, labor, and stated fees
A realistic DIY comparison includes the tools
Take a fictional $285 professional quote and a DIY list of $60 in materials plus $25 in tools. Your cash outlay would be $85, leaving a $200 difference. If you already own the tools, the difference is $225. Neither number puts a value on your time.
Illustrative calculation: $285 − ($60 + $25) = $200 before valuing your time.
This comparison works only if both options solve the same problem. If the professional quote includes adjusting a sticking door, the DIY list needs to account for that work too. Otherwise the apparent saving comes partly from leaving a task undone.
Check the opening before buying strips
Close and latch the door or window normally. Look for worn or missing seals and uneven contact. Check the bottom corners and threshold as well as the perimeter. Measure before shopping, and keep the product’s instructions for the correct profile and gap.
If you find rot, water entry, a soft frame, or a visibly misaligned opening, have the underlying problem assessed. A thicker strip may make the door harder to close while leaving the cause untouched. After any work, verify that the opening still closes, locks, and operates properly.
Weatherstripping seals moving joints; caulk is used at stationary gaps. DOE makes that distinction in its home energy guidance. A draft by a window does not, by itself, prove the whole window needs replacement. Our window-upgrade comparison helps separate those scopes.
Use a payback range, not a promised saving
Simple payback divides your project cost by annual savings attributable to that work. The inputs below are deliberately hypothetical; they show how sensitive the answer is to the saving you assume.
Annual saving assumed
Payback on a $285 project
$40
7.1 years
$80
3.6 years
$120
2.4 years
For the $85 DIY example, $40 a year would imply about 2.1 years. If there is no measurable saving, there is no energy-bill payback to calculate, though fewer drafts may still improve comfort.
Keep your starting bill and the installation date in your records. A lower bill in a milder winter is not proof of savings from the new seals. Compare the same kinds of charges and account for weather, rates, and changes in household use. Our energy-quote checklist explains what to ask when a contractor projects savings.
FAQ
Is a professional quote above $438 unreasonable?
Not necessarily. The national range does not describe every number of openings, product, access condition, or repair. Ask which items account for the difference.
Should I choose the cheapest material?
First match the opening and the required fit. Then compare price and replacement effort among suitable products.
How often should weatherstripping be replaced?
Inspect its condition and contact rather than relying on one calendar interval. Replace failed material according to the product and opening requirements.
Can I use 10% of my annual bill as the expected saving?
No. The ENERGY STAR figure covers a broader set of sealing and insulation improvements. Use a clearly labeled range if you cannot establish the saving from this project.
Prepared with AI assistance. Sources and arithmetic checked September 10, 2026. No home or product was tested. Prices are consumer-service benchmarks; all DIY and payback examples are illustrative.
Quick answer: If you are planning a new home energy project in 2026, do not subtract the former federal 25C or 25D credit from the price. Those credits ended for new qualifying work after 2025 under the rules below. State, territory, Tribal or utility programs are separate and need their own eligibility check.
A quote can look affordable because an old tax-credit line is still sitting at the bottom. Before choosing equipment, ask for a revised total that includes only incentives you can actually receive. Then look at the energy savings on their own.
Which federal rules changed?
Program
IRS cutoff
How to budget a new 2026 project
25C: Energy Efficient Home Improvement Credit
No credit for property placed in service after December 31, 2025
Use $0 for a new 2026 installation.
25D: Residential Clean Energy Credit
No credit for expenditures made after December 31, 2025
Do not carry the old 30% incentive into a new project estimate.
Home Energy Rebates and utility programs
Separate programs with local rules
Verify availability and approval before subtracting an amount.
Federal cutoffs: IRS Working Families Tax Cuts summary. Rebate administration: U.S. Department of Energy. Checked September 21, 2026.
The IRS summary of the law distinguishes property placed in service under 25C from expenditures under 25D. A deposit or an old quote is not enough to establish eligibility. If your project began in 2025 or you have an unused prior-year credit, check the detailed rules for that earlier claim; that is a different question from earning a new credit on a 2026 project.
The IRS also maintains separate pages for 25C improvements and 25D residential clean energy. For 25D, an expenditure is generally treated as made when the original installation is completed. A previous-year carryforward may still be usable subject to the applicable rules; do not confuse it with a new installation incentive.
A rebate is not an automatic replacement
The Department of Energy’s Home Energy Rebates page directs households to their state or territory energy office for program status and eligibility. A national description does not prove that your household, installer and equipment qualify—or that funding is still available.
Before signing, ask the administering program whether you need approval before work begins, whether the contractor must participate, which equipment qualifies, whether income limits apply and how the payment arrives. Get the answer for your address and proposed scope. Keep an unapproved incentive in a separate “possible” column, rather than reducing the amount you need to fund.
Recalculate payback with money you can substantiate
Here is a deliberately simple example. Assume an upgrade costs $10,000 installed and is expected to reduce annual energy costs by $600. These are hypothetical amounts, not a heat-pump quote or a savings claim for your house.
Budget case
Net cost used
Annual savings assumed
Simple payback
No verified incentive
$10,000
$600
16.7 years
A separately verified $2,000 rebate
$8,000
$600
13.3 years
Same rebate; savings only $400
$8,000
$400
20.0 years
Homestria calculations: net cost ÷ annual savings. The $2,000 rebate is an invented scenario, not an advertised entitlement. Financing, discounting, maintenance differences and future energy-price changes are excluded.
The low-savings case matters. A proposal can look sensible at one energy-price assumption and much less attractive at another. Ask the installer to state the annual electricity and fuel quantities behind the dollar saving. If an upgrade replaces gas with electricity, account for both bills and any fixed service charge that remains.
If equipment already needs replacing, compare the extra cost too
Suppose a suitable standard replacement would cost $7,000 and the efficient option costs $10,000. If both provide the needed service, the extra investment is $3,000. At $600 of annual savings relative to that standard replacement, incremental simple payback is five years, before incentives.
That is a different question from recovering the whole $10,000 against doing nothing. Both comparisons can be useful, but they must use the right baseline. The $600 saving against your old equipment may not equal the saving against a brand-new standard replacement. Ask for both comparisons before relying on the five-year result.
Make the final quote easier to check
Request a complete installed price, including electrical work, permits, removal and any duct or distribution changes. List incentives separately with the program name and approval evidence. Keep comfort, reliability and necessary replacement work in the decision too; a safety problem should not wait for an attractive energy-only payback.
Start with your actual utility bills, then use our energy quote checklist to question the assumptions. If attic work is part of the scope, separate leakage control from added insulation with our attic air sealing vs. insulation guide. This is a budgeting guide, not an eligibility determination or individualized tax advice. IRS and DOE sources were rechecked September 21, 2026. Homestria has not modeled or inspected your home.
Window repair commonly costs $70 to $1,700, with a reported average of about $405. Replacement is a different scope: individual windows commonly run $300 to $2,500, while a multi-window project averages about $7,347 and commonly falls between $3,436 and $11,837.
Repair usually makes sense when the failure is limited to hardware, weatherstripping, a screen, a sash component, or an insulated-glass unit and the surrounding frame and opening remain sound. Replacement becomes more reasonable when there is extensive frame decay, repeated seal failure, recurring water entry, obsolete parts, or a quote that includes multiple failing windows. Do not rely on a universal “repair if it is under 50%” rule. Compare the same opening, the same included work, and the same warranty.
Cost Comparison at a Glance
Service
2026 planning range
What the number may cover
Common exclusions to confirm
Window repair
$70–$1,700; average about $405
One localized repair such as hardware, weathersealing, glass, sash, or partial frame work
Access surcharge, custom glass, hidden water damage, finish work, taxes
Standard double-hung units with professional installation
Specialty shapes, difficult access, major opening changes
The key limitation is scope: a $405 repair average and a $7,347 replacement-project average are not prices for the same quantity of work. Ask for a per-opening schedule before comparing them.
What Can Usually Be Repaired?
Localized problems often have a repair path:
A broken latch, crank, balance, hinge, or lock
Worn weatherstripping or failed perimeter sealant
A torn screen
A failed insulated-glass unit or damaged sash, when compatible parts remain available
Limited frame rot that can be removed and rebuilt without leaving compromised material
An operational problem caused by adjustment rather than a distorted opening
The diagnosis matters. Fog between panes can indicate an insulated-glass seal failure, but it does not automatically prove that the entire frame and opening need replacement. A draft can come from the window, the rough opening, trim gaps, or nearby wall leakage. Ask the contractor to identify the path before approving a solution.
When Replacement Becomes the Better Scope
Replacement deserves stronger consideration when:
Rot or corrosion is widespread rather than localized
Water intrusion has reached the rough opening or adjacent wall
The frame is out of square, structurally compromised, or pulling away from the opening
Replacement parts are unavailable or repeated repairs have failed
Several windows have the same end-of-life problem
The existing configuration cannot meet a needed egress, safety-glazing, or operational requirement
The repair retains a weak frame or water-management detail that the replacement quote would correct
Age alone is not a diagnosis. A newer unit can need replacement after installation or water-management failure, while an older wood window may remain repairable. Base the decision on the condition of each opening and the actual work proposed.
Insert Replacement vs. Full-Frame Replacement
An insert unit fits within the existing frame. It may preserve interior and exterior finishes and reduce labor, but it also keeps the existing frame, sill, flashing, and some water-management conditions.
A full-frame replacement removes the window down to the rough opening. It can expose hidden damage and allow new flashing, insulation, sill-pan, and trim work, but it costs more and creates more finish and disposal work.
Two quotes using these different methods are not competing bids for the same project. Require each contractor to state:
Insert or full-frame method
What remains in place
How the opening will be flashed and sealed
Whether hidden rot is included, excluded, or priced by change order
Interior trim, exterior trim, siding, stucco, paint, and cleanup responsibility
A Worked Quote Comparison
Assume four windows have operational and seal problems.
Repair quote: $1,600 total, including hardware on three units, one insulated-glass unit, weathersealing, labor, and cleanup.
Replacement quote: four standard units at $750 each plus $600 for trim and waterproofing work, for a $3,600 planning total.
Immediate difference: $3,600 minus $1,600 equals $2,000.
The repair quote equals about 44% of the replacement quote, but that ratio does not decide the project. The decisive questions are whether the retained frames and water-management details are sound, how long replacement parts will remain available, and what each warranty covers. If the repair quote omits a leaking rough opening that the replacement quote corrects, the two figures are not comparable.
What Changes the Price?
Number and type of windows. Bay, bow, large picture, specialty-shape, and multi-pane units generally require more material and labor.
Frame and finish material. Wood can be repairable but may require skilled carpentry and refinishing. Fiberglass, composite, aluminum, and vinyl have different repair options and part availability.
Access. Second-story, roof-access, skylight, and tight-property-line work may require added equipment and labor.
Glass package. Tempered, laminated, impact-rated, low-emissivity, triple-pane, decorative, and custom glass can move a bid well beyond a standard unit.
Opening condition. Rot, insect damage, failed flashing, out-of-square framing, or damaged cladding can turn a unit swap into a reconstruction project.
Region and regulation. Labor rates, permits, energy code, wind-borne-debris requirements, historic-district rules, and lead-safe work practices vary by location.
Energy Performance: Compare Ratings, Not Marketing Claims
For replacement products, request the exact NFRC label or certified ratings for the quoted configuration. The label can include:
U-factor: lower values indicate less heat transfer through the product
Solar Heat Gain Coefficient: lower values admit less solar heat; the right target depends on climate and exposure
Visible Transmittance: higher values admit more daylight
Condensation Resistance: higher values indicate greater resistance under test conditions
Air Leakage: lower values indicate less air leakage through the product
Do not accept a savings percentage without the assumptions behind it. Heating and cooling savings depend on the old window, installation quality, climate, shading, air leakage elsewhere, thermostat settings, and energy prices.
Safety and Lead-Paint Limits
Broken glass, unstable sash, second-story exterior work, and active water damage are not good trial-and-error projects. For homes built before 1978, paid work that disturbs painted surfaces may fall under EPA or authorized state/tribal lead-safe renovation requirements. Ask whether the contractor and work method meet the rules that apply to the property.
Questions to Ask on Every Quote
Which component failed, and what evidence supports the diagnosis?
Is the price per opening or for the entire project?
Is the method repair, sash/IGU replacement, insert replacement, or full-frame replacement?
What remains in place?
Are flashing, sill-pan, insulation, sealants, trim, paint, siding or stucco repair included?
How is hidden rot or structural damage priced?
Are permits, disposal, taxes, and access equipment included?
What exact product and NFRC ratings are quoted?
What parts-and-labor warranty applies, and who provides it?
If the home predates 1978, how will lead-safe requirements be handled?
How to Decide Without Guessing
Choose repair when the problem is clearly localized, the opening is dry and structurally sound, compatible parts are available, and the warranty is meaningful.
Choose replacement when the quote corrects a broader failure—extensive decay, bad flashing, structural distortion, recurring leakage, obsolete components, or many similar failures—and the contractor defines the opening and finish work.
Get another diagnosis when one contractor recommends a small repair and another recommends full-frame replacement. The disagreement may be about scope, not price.
Frequently Asked Questions
Is it cheaper to repair a window or replace it?
Usually, for one localized defect. The 2026 repair range is $70–$1,700, while individual replacement commonly runs $300–$2,500. A repair can still be poor value if it leaves widespread rot, recurring leaks, or an unsound opening.
Does fog between panes mean I need a new window?
Not always. It often points to an insulated-glass seal failure. Depending on the design and part availability, a sash or glass-unit replacement may be possible without replacing the entire frame.
Should I replace all windows at once?
Not automatically. Bundling can lower the per-window price, but replacing sound units increases the total project. Group windows by condition, exposure, product compatibility, and project setup costs.
Are insert and full-frame quotes comparable?
No. An insert keeps most of the existing frame. Full-frame work removes the unit to the rough opening and usually includes more flashing, insulation, trim, and restoration work.
Can new windows guarantee lower energy bills?
No. Product ratings help compare performance, but realized savings also depend on installation, climate, shading, the existing windows, and air leakage elsewhere in the house.